Popper
Introduction
In this lab we will look at a dataflow system called Popper for building ML workflows. One of the many interesting features of Popper that you will learn about is its built-in support for in-flight error handling. Popper implements a python based dataflow language called PYSCOPE for specifying dataflow programs. Users can use traditional data processing operators such as map, filter, join, etc. in addition to Popper’s in-flight error handling operators (discussed later).
Part 0: Getting Started
Prerequisites
- Install Docker Desktop for your operating system:
- Docker Desktop for Windows
- Note: Windows Subsystem for Linux (WSL2) required
- Docker Desktop for macOS
- Docker Desktop for Linux
- Docker Desktop for Windows
- Verify Docker Engine is running by checking the Docker Desktop application status
Installing Popper
Pull the Popper Docker image:
$ docker pull datasystems/popperlite:latest
Launch Popper in Docker:
Note for macOS Users
Port 5000 is reserved on macOS. Use this command to map to port 6000 instead:docker run -it --name popper -p 5173:5173 -p 6000:5000 datasystems/popperlite:latest /bin/bash
docker run -it --name popper -p 5173:5173 -p 5000:5000 datasystems/popperlite:latest /bin/bash
Using VS Code Dev Containers Extension (Recommended)
For a better development experience, we recommend using VS Code with the Dev Containers extension:
-
Install the Dev Containers extension in VS Code
-
After starting the container as shown above, click the blue button in the bottom-left corner of VS Code (or press Ctrl/Cmd + Shift + P and search for “Dev Containers: Attach to Running Container”)
-
Select the running
poppercontainer -
VS Code will reopen connected to the container, giving you better experience :)
You should now see a terminal in VS Code that looks like:
root@75a91d135cdf:/popper#
Start Redis:
root@75a91d135cdf:/popper# make redis
Start the Object Store:
root@75a91d135cdf:/popper# make objstore
Test if the installation was successful, try running some tests in a new terminal:
If you are not using VS Code Dev Containers
``` # Connect to container $ docker exec -it popper /bin/bash ```root@75a91d135cdf:/popper# pytest -s scope/integration_tests/append_test.py
Upon successful test completion, navigate to the ws24_demo directory:
cd ws24_demo
Initialize the required models by executing the test_light_models.py script:
root@75a91d135cdf:/popper/ws24_demo# python3 test_light_models.py
Our docker image comes with pre-installed Python dependencies required for Popper.
Part 1: Understanding PYSCOPE
Before we start writing workflows, let’s have a look at PYSCOPE, the dataflow language POPPER uses to write workflows. PYSCOPE extends the SCOPE language from Microsoft [VLDB 2008] with inflight error-handling.
Extractor: Constructs rows from unstructured sources like files.Processor: Processes each row individually.Reducer: Processes groups of rows.Combiner: Combines multiple rows (like a traditional join).Outputter: Writes rows to a data sink.
These are base operators provided by PYSCOPE; you can extend these operators to
build you own custom operators. for e.g. LineReader can be an Extractor that
reads lines from a file.
Now, since we are equipped with the necessary knowledge, let’s write our first workflow!
Part 2: Writing your first ML workflow
We will walkthrough a simple workflow to get a flavor of how they are written in Popper. The point of this workflow is to create a simple sentiment analysis pipeline.
We write 3 main custom operators for this job:
LineReader: This extends theExtractorclass and reads lines from a file. (you can find this operator implemented inscope/builtins/extractors.py)SentimentProcessor: This extends theProcessorclass and performs sentiment analysis on the input text. (we will implement this operator in the next few steps)CsvWriter: This extends theOutputterclass and writes the output to a CSV file. (you can find this operator implemented inscope/builtins/outputters.py)
In our working directory “ws24_demo”, let’s create a new file called ml_test.py and start writing our code.
First let’s get all our necessary imports out of the way:
import os
from typing import Any, Generator

import config
from scope.builtins.outputters import CsvWriter
from scope.core.job import Job
from scope.core.jobbuilder import JobBuilder
from scope.core.nodes import OutputterNode
from scope.core.utils import topologicalSort
from scope.builtins.extractors import LineReader
from scope.model.row import Row
from scope.model.rows import Rows
from scope.operators.outputter import Outputter
from scope.operators.processor import Processor
from transformers import pipeline
In order to write the workflow, we will use the JobBuilder class from
jobbuilder.py. This will be our entry point to writing a workflow. The
JobBuilder provides a set of methods to add operators to the workflow like
extract(), process(), output(), etc. These operators are then chained
together to form a workflow.
Let’s first create a prepareJob() function that will return a Job object.
Here we will give it the input and output paths and then chain the operators
together to form the workflow.
def prepareJob() -> Job:
    # define input/output paths
    abs_out_path = os.path.join(config.popper.WORKSPACE, "sentiment/ml_out.txt")
    abs_in_path = os.path.join(config.popper.WORKSPACE, "sentiment/ml_in.txt")
Within the prepareJob() function, we will create a JobBuilder object and
then chain the operators together to form the workflow.
    jobc = JobBuilder()
    return jobc.extract(using=LineReader(frm=abs_in_path, out_col=b"line")) \
            .process(using=SentimentProcessor(in_col=b"line", sentiment_col=b"sentiment")) \
            .output(using=CsvWriter(to=abs_out_path, order=[b"line", b"sentiment"])) \
            .job.pre_build()
Optional: read more about JobBuilder
JobBuilder also has these (constructor) parameters: - `disable_opts`: This is an optional parameter that allows you to selectivley disable the optimizations for the job. - `dag_opt`: This is a boolean parameter that enables **all DAG optimizations** for the job. - `enable_gc`: This is a boolean parameter that enables **garbage collection** for the job. - `hint`: This is an optional parameter that allows you to specify a hint for the job. - `template`: This is an optional parameter that allows you to specify a name for the job. Once the job is created, we can call `pre_build()` which will add the necessary edges to the workflow and saves the initial job state to Redis.Now, let’s create our test function test_run_ml() to see if our workflow is
working as expected, In this test we will first call prepareJob() and then
call build() which will type check the entire workflow, optimize the workflow,
and prepare the job for execution.
Finally, we can call run() which will execute the workflow, wait for all
stages to complete and return our desired output.
def test_run_ml() -> None:
    job = prepareJob()
    job.build().run()
We have not implemented the SentimentProcessor operator yet, lets do that now.
Some necessary methods to implement for your custom operator:
You will need to inherit from the Processor class and implement the
__call__() method.
- The
Processorbase class provides two methodspre_call()andpost_call()which can be used to perform any setup/cleanup operations. - The
pre_call()method is called before the__call__()method is called. You can use this method to load any models you might need. - The
post_call()method is called after the__call__()method is called. You can use this method to clean up any resources you might have initialized in thepre_call()method. - The
__call__()method is where the main logic of your custom operator goes.
Let’s implement SentimentProcessor to get a better understanding of how this
works.
class SentimentProcessor(Processor):
    # Initialize the operator with the input and output column names
  def __init__(self, in_col: bytes, sentiment_col: bytes):
    # the `Processor` class takes in two arguments: `in_col_types` and
    # `out_col_types`. These are dictionaries that map the input and output
    # column names to their respective types.
    super().__init__(
        out_col_types={b"model": b"str", sentiment_col: b"str", b"confidence": b"float"},
        in_col_types={in_col: b"str"}
    )

    # Remember the input and output column names
    self.in_col = in_col
    self.sentiment_col = sentiment_col

    # set the sentiment pipeline to None initially
    self.SENTIMENT_PIPELINE = None

  def pre_call(self):
    # Initialize the sentiment analysis pipeline, this is done here, so that
    # we don't have to load the model again and again for each row in the __call__() method
    self.SENTIMENT_PIPELINE = pipeline(
        "sentiment-analysis",
        model="distilbert-base-uncased-finetuned-sst-2-english",
        device=-1
    )

  def post_call(self, **kwargs: Any) -> list[Row]:
    # Clean up the sentiment pipeline
    self.SENTIMENT_PIPELINE = None

  def __call__(self, input_row: Row, *args: Any, **kwargs: Any) -> Generator[Row, None, None]:
    # The __call__() method is where the main logic of your custom operator goes.
    # It takes in an input row and yields an output row.

    # Get the input text
    line = input_row.get_value(self.in_col)

    # Perform sentiment analysis
    result = self.SENTIMENT_PIPELINE(line)[0]
    sentiment_label = result['label']
    confidence = result['score']

    # Create output row
    out_row = Row(Rows(**kwargs), from_rows=[input_row], data_dict = {
        self.sentiment_col: sentiment_label,
    })

    # Instead of using data_dict, we can also use the `set()` method to set the
    # value of a column in the output row.
    out_row.set(b"confidence", confidence)

    yield out_row
Now, we can run our test to see if the workflow is working as expected:
# Run test
root@75a91d135cdf:/popper# pytest -s ws_24/ml_test.py
Once the job is completed, the output will be saved at data/sentiment/ml_out.txt.
We observe that all the positive and negative sentiments are correctly
classified and written to the output file.
Visualizing the workflow
Popper also provides a dashboard to visualize the workflow. To start the visualization backend, run the following command:
root@75a91d135cdf:/popper# make server
To spin up the UI run the following command:
root@75a91d135cdf:/popper# make demo
You should now be able to see the dashboard by navigating to localhost:5173 in your web browser.
This hopefully gave you a good idea on how to write workflows in Popper,
Exercise 1
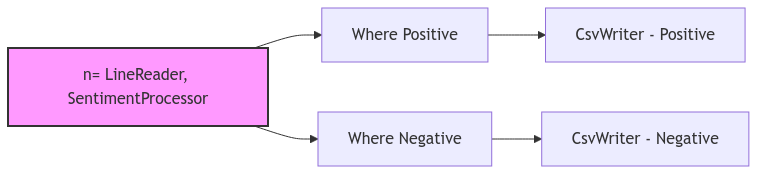
Task: Modify the sentiment analysis job to separate the positive and negative sentiments into different files.
Starting with the existing sentiment analysis job, implement the following requirements:
Try using the where() operator in JobBuilder to separate the positive and negative sentiments
The output should show now only show the line column
Need help getting started?
- Learn how to write `where()` operators from `scope/integration_tests/where_as_group_test.py`. - You will need two separate outputters to write to two different files for the positive and negative sentiments. - Try using the `get_node()` method to break the chain and give access to the last node in the workflow (see next section for more details).Popper provides you with a get_node() accessor method in JobBuilder which
returns the last node in the workflow. If you observe, each node in our previous
workflow was connected in a chain like this:
jobc.extract(using=LineReader(frm=abs_in_path, out_col=b"line")) \
    .process(using=SentimentProcessor(in_col=b"line", sentiment_col=b"sentiment")) \
    .output(using=CsvWriter(to=abs_out_path, order=[b"line", b"sentiment"]))
using the get_node() method, we can break the chain and get access to the
last node in the workflow. for eg. we want to break the chain after the
process() method and give access of this set of nodes to some other operator.
We can do this as follows:
n = jobc.extract(using=LineReader(frm=abs_in_path, out_col=b"line")) \
        .process(using=SentimentProcessor(in_col=b"line", sentiment_col=b"sentiment")) \
        .get_node()
we can now give this node n to some other operator using the inp= parameter
provided by the node creation methods like where(), output(), etc.
jobc.where(inp=n, predicate=is_positive, in_col_types={b"sentiment": b"str"}) \
    .output(using=CsvWriter(to=abs_out_path, order=[b"line"], gt=(gt_pos_path, csv_parse)))

jobc.where(inp=n, predicate=is_negative, in_col_types={b"sentiment": b"str"}) \
    .output(using=CsvWriter(to=abs_out_path, order=[b"line"], gt=(gt_neg_path, csv_parse)))
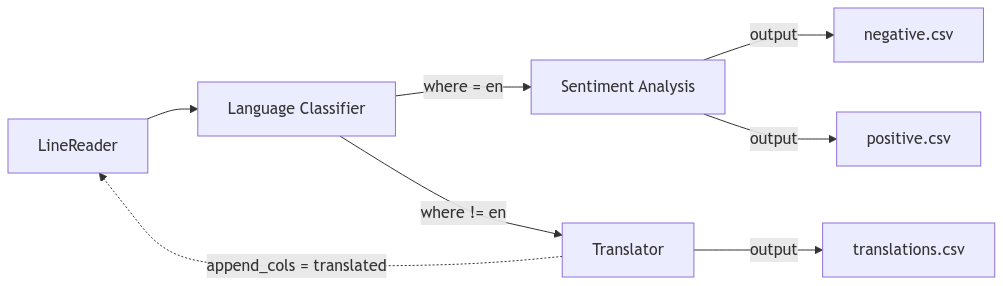
Part 3: Multi-lingual sentiment analysis
Exercise 2
Task: Create a multi-lingual sentiment analysis workflow that can handle both English and non-English text.
Starting with the sentiment analysis job from Exercise 1, implement a workflow that:
Use the following ML models:
- Language classifier:
papluca/xlm-roberta-base-language-detection - Translator:
facebook/nllb-200-distilled-600M - Sentiment analyzer:
cardiffnlp/twitter-roberta-base-sentiment
Your workflow should:
Uses a language classifier ML model to detect if input text is in English
Use an ML model that Translates non-English text to English
Performs sentiment analysis on all texts (both original English and translated)
Outputs results to separate files for positive and negative sentiments
The workflow should follow this structure:

Need help getting started?
1. You'll need to create these new operators: - `LanguageClassifier`: Extends `Processor` to detect the text language - `Translator`: Extends `Processor` to translate non-English text to English 2. Use the `where()` operator twice after the classifier: - One branch for English text (where language == "en") - One branch for non-English text (where language != "en") 3. Use the `union()` operator provided in the `Jobbuilder` to combine the English and translated texts before sentiment analysisPart 4: Error handling
We refer to Popper workflow with error handlers as Reactive Dataflows. These are modeled as directed cyclic graphs which allow downstream operators to fix errors that may have occured in upstream operators. This is crucial for in-flight error handling.
Popper provides various APIs for applying upstream modifications:
row.edit(): allows you to edit a row in the output of an upstream operator. For example, let us say we got a row with a spelling mistake{b"line": "rice movie!"}which then gets{b"sentiment": "negative"}. A later operator can fix the spelling error by callingrow.edit({b'line': "nice movie"})to fix the upstream row containing the line output.
It will do backward tracing to first identify the upstream output row containing the column line; it will delete this upstream output row and append the editted row. Popper will automatically incrementally propagate these deletes and appends downwards.

-
Similarly,
row.append()takes a dictionary of column names to column values. For example, let us say we got ainput_rowwith{b"line": "my wife and I liked the food!"}. We can callrow.append({b"line": "my husband and I liked the food!"}). Append works in a manner similar toeditwith the only difference that it does not delete the original upstream row. -
row.delete(): allows you to delete upstream rows. It needs a column to perform backward tracing. In the example above, row.delete([b’line’]) deletes both the line and the sentiment row, where row.delete([b’sentiment’]) only deletes the sentiment row.
Similar to in_col_types and out_col_types, the base Operator class has the
edit_cols, append_cols and delete_cols parameters that are needed if the Operator
is using the above APIs. These parameters help JobBuilder realize the back
edges which are further used to build the auxiliary graph and plan stages.
Exercise 3
Task: Use Popper’s error handling APIs to catch and fix ML errors.
In this exercise, we introduce synthentic errors into the translation model. Change your translation to
translated_text = random.choices([text, translated_text], weights=[0.1, 0.9])[0]
Now because the translations can be incorrect, we want to send them back to the classifier. If the classifier again classifies it as non-english, we would like to drop the row.
Additionally, try outputting the translated along with the original line to a separate file.
Starting with the multi-lingual sentiment analysis job from Exercise 2, implement error handling that:
Synthetically make translations erroneous
Send translated texts back to the classifier to double check that they are now in English
Prevents infinite loops by tracking which rows have already been translated
Drops rows that fail to identify as English even after translation
Outputs the translated and original lines to a separate file (translations.csv)
The workflow should follow this structure: